I
enjoy getting my craftiness on. I especially enjoy getting crafty and creative
with gifts {when time, energy, and income permit}. As the weather starts to
warm up, and I truly believe that one of these days it will warm up and stay warm
for a while, I start to notice the use of coasters becomes more common.
I
use coasters most often when the weather is warm and I don’t want my glass to
sweat and ruin my table. I am longing for the truly warm weather so that I can
make a batch of ice tea to take out back while the kids run circles around me.
So in the hopes that by making these coasters I will be bringing on the warm
weather I have decided to share with you my little tutorial on how to make
custom coasters.
I
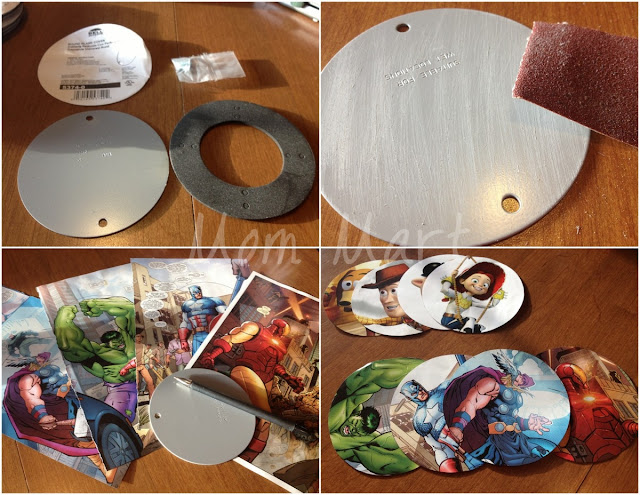
made these as a gift for my sister-in-law and her family {Toy Story Coasters}
and for my sister and her family {Avengers Comic Coasters}. I used comics, but
I have seen this done with scrapbook paper and photographs as well. I haven’t
personally done the photographs as of yet, so I cannot tell you how that would
turn out. Just be aware that if you print something off on an inkjet printer
and try to use that for this project – the ink will bleed and you will have a
hot mess of a coaster. I’m a little dorky and love the comics and cartoons, so
that is what I use.
What you need:
Round
Blank Cover {like the ones they use to cover old lighting sockets}
Comics
Sandpaper
Mod
Podge
Sandpaper
{a little will go a long way}
Pen
Cutting
utensil {either a box cutter, craft knife, or scissors}
Hot
glue gun
How to Make It:
Take
the round blank cover and open it up. You will want to save the foam backing
for later as it will be hot glued onto the back to create a nice padding for
the coaster {and will prevent the coaster from scratching surfaces}.
Pick
out the pictures you want to use for the coasters from your comics and use the
round blank cover to trace around the picture.
Cut
out the picture.
Take
the sandpaper and use it to scratch up one side of the round blank cover {so
that the mod podge will better adhere}.
Coat
the scratched up round blank cover with mod podge and then place the picture on
top, coating it with another layer of mod podge. Make sure to smooth out any
bubbles or wrinkling.
Let
the paper dry.
Once
dry I like to scratch up the surface a little {very little} and add another
coat of mod podge.
When
the coaster is completely dry flip it over and use a hot glue gun to adhere the
foam backing that came with the round blank cover {you could use felt or cork,
but these little covers came with a foam backing that fits perfectly and
required no extra work…}.
Making
these coasters took a little bit of work, more than just the set up and clean
up that a lot of projects require – due to the fact that drying time was needed
and there were multiple steps. While this is not a complex craft requiring a PhD
to complete, it does take a little time to finish and a space for drying out of
reach of curious little fingers.
My
little guys helped me do this craft in stages. They picked out the pictures we
would use and I cut them out. They helped me sand a bit and even took a turn
with the mod podge, helping to glue the paper to the round blank cover. The hot
glue gun is off limits to my boys, so I did that all by myself. They liked
helping, but were not big fans of waiting for the glue to dry. I can’t really
blame them.
I
think that we will be making some for ourselves soon. I am thinking that
Batman, Green Lantern, Superman, and Wonder Woman would work for a super summer
theme. They will come in handy once the weather heats up and hopefully my
children will WANT to use them and stop leaving milk rings and sweat circles on
my tables.
Do you use coasters?


